Free worldwide shiping on $150+
Simulate the Proscenic M6 Pro robot vacuum in Gazebo with ROS 2
Run a full Proscenic M6 Pro vacuum simulation in Gazebo with the oomwoo ROS 2 image: SLAM mapping, autonomous Nav2 navigation, manual driving and bumper sensors — no hardware needed.
This tutorial shows how to run a full Proscenic M6 Pro robot vacuum simulation in Gazebo using the open-source oomwoo (Kaia.ai) ROS 2 Docker image. You will map a living room with SLAM, send the robot autonomous navigation goals with Nav2, drive it manually, and watch its bumper sensors fire when it bumps into objects — all without any hardware. The Proscenic is bridged to ROS 2 the same way as the physical robot, so what you learn here transfers directly to the real vacuum.

What you’ll need
- Docker installed (Docker Desktop on Windows/macOS, or Docker Engine on Linux).
- An X server for the Gazebo and RViz windows. On Windows, VcXsrv or X410; on Linux the native X server works.
- No robot required — everything runs in simulation.
1. Pull the Docker image
docker pull makerspet/oomwoo:jazzy-dev2. Start the container
Start your X server first, then launch the container. On Windows (Command Prompt):
docker run --name makerspet -it --rm ^
  -v c:\maps:/root/maps ^
  -p 8888:8888/udp -p 5555:5555/udp ^
  -e DISPLAY=host.docker.internal:0.0 -e LIBGL_ALWAYS_INDIRECT=0 ^
  --add-host=host.docker.internal:host-gateway ^
  makerspet/oomwoo:jazzy-dev
This drops you into a shell inside the container. You will open a few more shells into the same container as you go — from another terminal, run:
docker exec -it makerspet bash3. Select the Proscenic M6 Pro
Tell the Kaia.ai launch files which robot to use:
kaia config robot.model proscenic_m6pro4. Launch the Gazebo world
Bring up the living-room world with the Proscenic spawned in it:
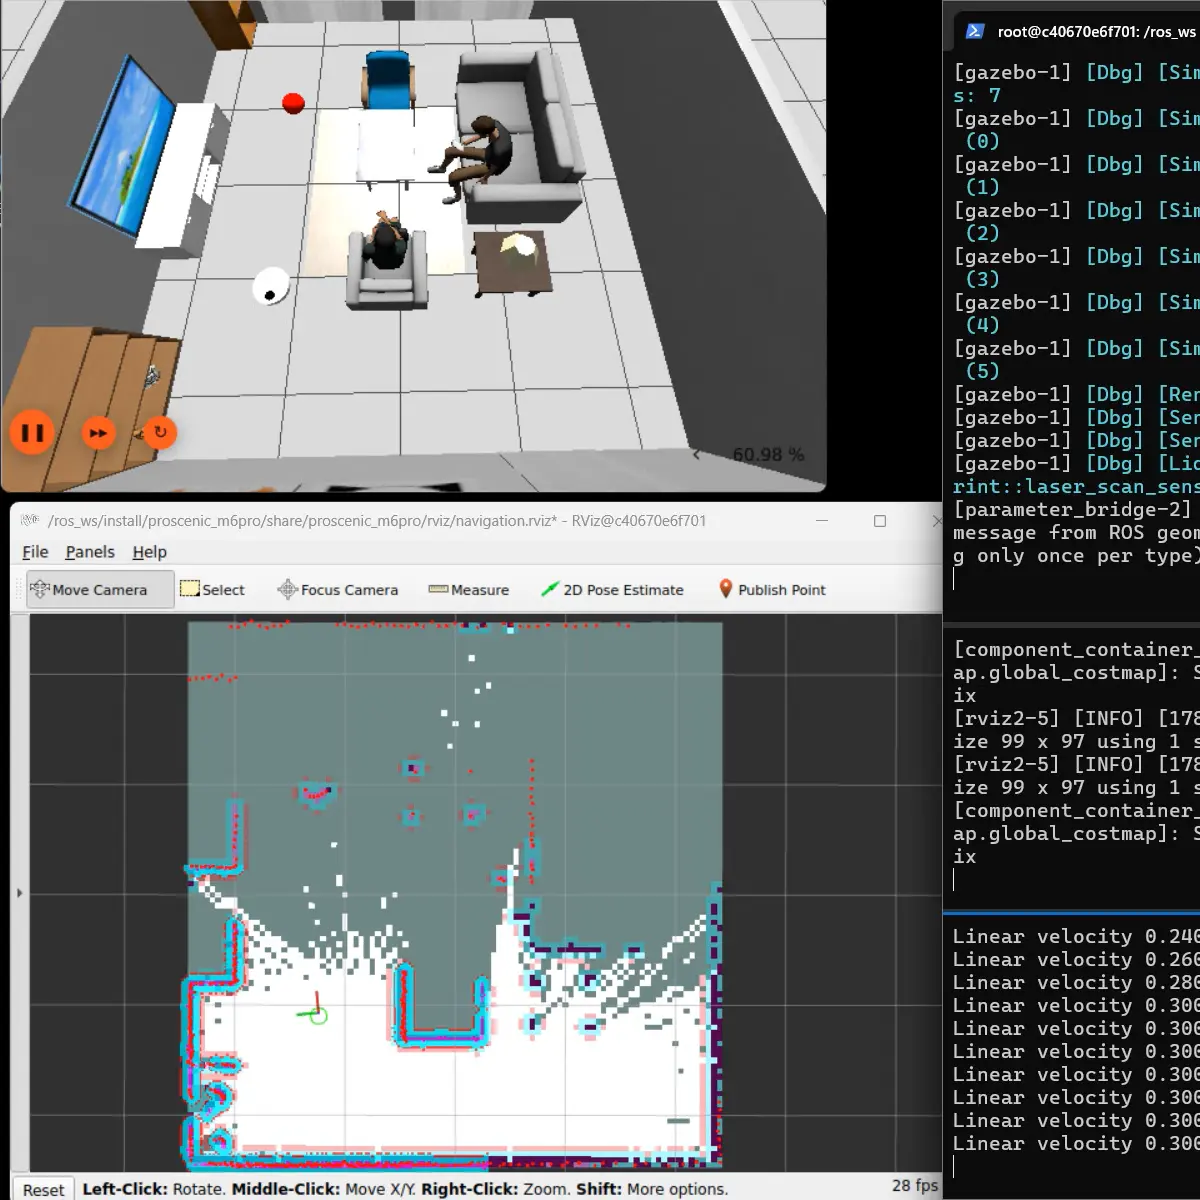
ros2 launch kaiaai_gazebo world.launch.pyA Gazebo window opens showing the gray, round Proscenic M6 Pro in a furnished living room. The robot publishes a LiDAR scan, wheel odometry and TF, exactly like the physical robot does through the ROS 2 bridge.
Get new tutorials by email
5. Start SLAM
In a second shell (docker exec -it makerspet bash), start mapping:
ros2 launch kaiaai_bringup navigation.launch.py use_sim_time:=true slam:=TrueThis runs the Nav2 navigation stack, tuned for the Proscenic’s ~349 mm footprint.
6. Open RViz
In a third shell, launch the RViz monitor to see the map, laser scan, robot model and costmaps:
ros2 launch kaiaai_bringup monitor_robot.launch.py use_sim_time:=true7. Drive the robot manually
In a fourth shell, start the keyboard teleop and drive the robot slowly around the room to build the map. Keep this terminal focused while you steer:
ros2 run kaiaai_teleop teleop_keyboardAs you drive, watch the occupancy-grid map grow in RViz.
8. Navigate autonomously with a Nav2 goal
Once you have a usable map, let the robot drive itself. In the RViz toolbar, click Nav2 Goal, then click-and-drag on the map to set the destination and the arrow direction to set the final orientation. Nav2 plans a path and the Proscenic follows it, avoiding furniture along the way. In the video above, the robot drives under a lamp table, steers around a seated figure, passes beneath the center marble table, and exits to its left.
9. Trigger the bumpers (drive into the red ball)
The simulated Proscenic has left and right front bumper contact sensors, just like the real robot. Switch back to the teleop terminal and drive head-on into the red ball in the living room. In another shell, echo the bumper topics to see the contact events:
ros2 topic echo /bumper_left/contact
ros2 topic echo /bumper_right/contact
Each topic reports a contact message the moment that side of the bumper touches an object.
How LiDARs are used in self-driving robots?
Build a real LiDAR self-driving Arduino/ROS2 robot using our kit - with complete step-by-step instructions. No robotics experience necessary.
See the full robot kit →10. Save your map
When you are happy with the map, save it for later autonomous runs:
ros2 run nav2_map_server map_saver_cli -f ~/maps/mapNext steps
The same image and launch files drive the physical Proscenic M6 Pro — you swap the Gazebo world for the robot bring-up and point it at the vacuum’s IP address. The simulation is the easiest place to learn the workflow before connecting real hardware. Happy mapping!