Free worldwide shiping on $150+
Keep 3D printing filament dry properly – make an airtight spool container
If you print only PLA filament, I don’t think you need any of this “nonsense”. Otherwise, if you print just about everything else including PETG, ABS, ASA, Nylon, TPU, polycarbonate and so on – read on!
Most 3d printing filaments, except PLA, are hygroscopic, i.e., they absorb moisture from the air. You can usually tell that your filament got moist by
- Hearing the distinct popcorn-popping sound as the filament makes its way through the 3D printer’s extruder. The extruder quickly heats up tiny moisture pockets, turning them into little bubbles of compressed steam.
- Noticing your print having unusually many pockmarks left by the steam bubbles that have burst.
- Noticing atypically lots of stringing in your print.
Once, when I didn’t know any better, I tried 3D-printing a tire using a newly purchased flexible TPE filament. I took off the packaging of the filament spool, hoisted the spool on top of my Prusa MK3S and started the print. After 5-10 minutes, I started hearing the popping sound, the print got stringy, and the tire started getting riddled with conspicuous pockmarks. That’s how quickly your filament can go bad!


If your print looks similar to the pictures above, moisture may have ruined your filament – and you need a few things to keep your filament dry:
- An airtight filament container
- Desiccant of a certain type
- A hygrometer
Tip: your filament being wet is only one of several reasons for stringy prints. Other reasons may include
- Insufficient print cooling – check your print fan speed
- Printing too hot – check your extruder temperature setting
- Filament retraction settings – try a number greater than zero
- Extruder path – try setting the “seam position” setting in your slicer away from “random”
Build Instructions

First, get yourself an airtight container that fits a typical 1KG spool of filament:
- Search Amazon for a Rubbermaid 21-Cup Dry Food Container
- As of 08-2023, Ace Hardware sells one here
The container dimensions should be 10.5″H x 9.3″L x 4.7″W. The height and the length can be larger, but the width should not exceed 5″. The container’s lid should be plain, as illustrated above – no fancy lid-built-into-another-lid, easily-pour-your-cereal types.
Second, get yourself the items below. Search Amazon if needed.
- A piece of standard PTFE tubing with 2mm inside and 4mm outside diameters. The length depends on your 3D printer setup – usually 50cm should be plenty enough.
- A PTFE tube PC4-M10 fitting, i.e., one with a M10 6mm thread and an inner diameter of 4mm to match your PTFE tube.
There are at least two types of PTFE tube fitting – PC4-M10 and PC4-M6. Use the one with the thicker base – shown below on the left – so that the PTFE tube can go through the fitting all the way. A fitting with a narrow base ends up scratching filament when the filament comes in at an angle. The scratched-off filament debris clog up the fitting and block the filament’s motion.
 to avoid clogging")
Next, download and 3D-print:
- A “spool insert”, see CAD screenshots below.
- Two spool insert “side holders”.


Choose a spool insert’s outer diameter that fits into your filament spool. Choose the largest insert diameter that still makes your spool rotate effortlessly over the spool insert.
Assemble your filament container:
- Drill a 6mm side hole on each “largest” side of the container.
- Use 2x M6x12 screws and 2x M6 washers to mount the spool insert side holders, one on each side.
- Drill a 9mm hole in the container lid as shown and screw in the PTFE tube fitting.
- Insert the spool holder inside the spool.
- Use your hand to spread the large sides of the container apart just enough to insert the spool into the container, such that the spool axle side holders “snap” into the spool holder’s side openings. This step may take some practice.
- When assembled correctly, the spool should rotate effortlessly inside the container.
- Insert your PTFE tube into the lid fitting and trim the PTFE tube to size for your 3D printer setup.
Make sure the holes are centered on the container’s side and aligned with respect to each other. You don’t want your spool insert sitting crooked in the container.
- Start by laying the container flat on the table.
- Place a spool on top of the container, like a sandwich.
- Center the spool on top of the container – eyeballing may be enough.
- Mark the center of the spool on the container’s side.
- Double check the center mark’s location with a ruler.
- Repeat the above with the other side of the container
Your assembled filament container should look like the pictures below:


Lastly:
- Run the filament through the lid fitting and the PTFE tube.
- Close off the container using the lid and make sure the lid makes an airtight seal.
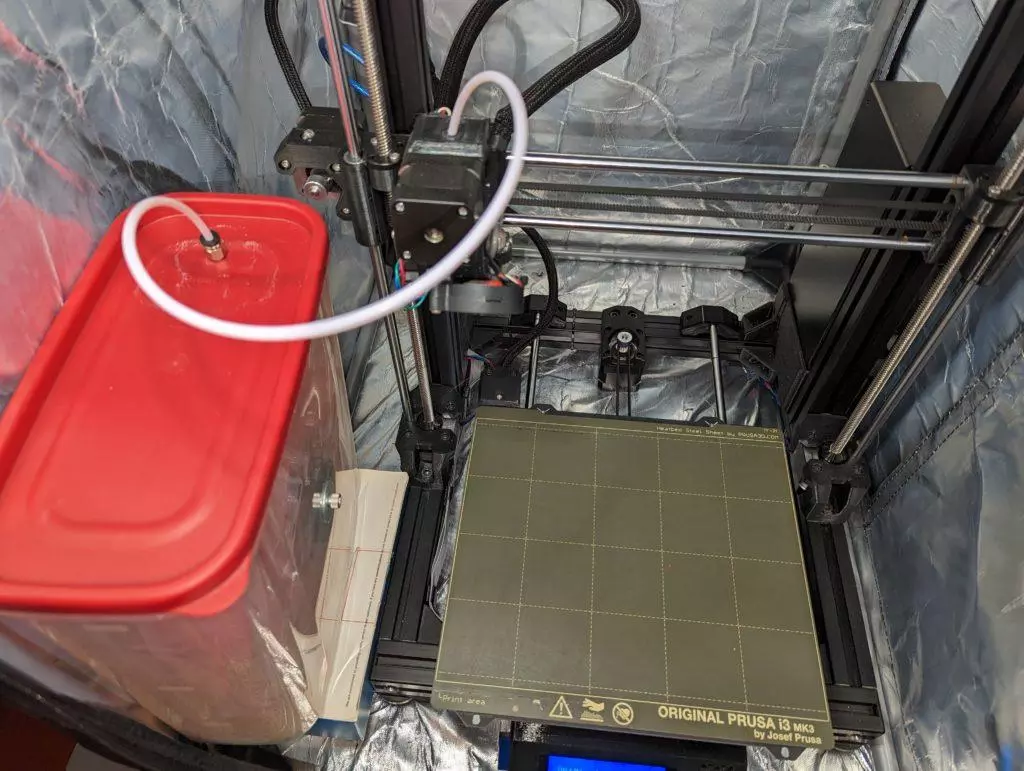
- Connect your PTFE tube to your printer and insert the filament into your 3D printer’s extruder.
Here are Prusa MK3S and Voron 2.4 examples. In case of Prusa 2.5S/3S/4 and its clones, just let the PTFE tubing’s end touch the extruder – don’t force the tube inside the extruder’s top opening.


Word of caution, once you’ve inserted your spool inside the container, watch out for filament slipping off the spool – it can jam our print!

Great, you’ve made it to the end of the article! In the next article we will talk about which kind of desiccant to use in your spool container.
Please find all files in this Maker’s Pet GitHub repository available for download.
Happy 3D printing!
IN the Maker’s Pet Githum “repository” hot link above, there is a link to the latest instructions which does not work. I would like very much to see that document.
Fixed! Thank you for letting me know! That link points right back to this article. This article has the latest instructions I have.
I have a Bambu P1S:
1) When you UNLOAD the filament to use another filament spool, do you unload as usual and have the filament exit the PTFE tube back into the container? If so doesn’t that introduce the potential for filament slipping off the spool with potential for jamming? If so, what do you do to avoid that?
2) I thought I read (but can’t today find the passage) when you have removed the filament from the printer/PTFE tube and back into the container, to cover the hole in the PTFE fitting with tape. How do you do that and still able to pull out the filament end when you want to use the spool again?
3) does the new length of the PTFE tubing now require use of this enclosure for all spools used or can you still use the longer PTFE tube and the standard spool holder or do you need to swap out PTFE tubes or something else?
Thanks
In case the filament can slip off the spool during the unload, I just pull the PTFE tube back a bit and cut the filament off. Then unload the little remaining piece of the filament.
I usually seal off the hole with a piece of a Scotch tape.
I haven’t designed for the Bambu P1S specifically, so I can only generalize. In my setup, the dry box and its PTFE tube run is the only feed path — there’s no “stock holder still in play” mode. If you wanted to keep both options open on a P1S, you’d most likely need to swap PTFE tubes since the lengths and routing are different. Curious to hear how P1S owners have handled this.
I read about a PTFE connector that might work. After you UNLOAD and pull back the filament, you would disconnect the PTFE tube to the connector and then connect the next PTFE tube after manually loading the filament and ensuring that it is caught by the extruder.
Possible PTFE connector:
https://www.amazon.com/s?k=ptfe+connector+3d+printer
That’s a good find – thanks!